
18 Beginner Friendly Woodworking Projects to Try
Starting my woodworking journey felt like standing at the edge of a vast forest with nothing but a pocket knife – intimidating, overwhelming, and slightly terrifying. But here’s what I discovered: you don’t need a workshop that rivals Bob Vila’s or a bank account that can handle every tool in the hardware store. Some of the most beautiful, functional pieces in my home came from simple beginner projects that required just basic tools and a willingness to learn.
Woodworking has experienced an incredible surge in popularity, and for good reason. In our digital world, there’s something deeply satisfying about creating something tangible with your own hands. These beginner woodworking projects aren’t just about building furniture – they’re about building confidence, developing skills, and creating pieces that tell your story.
Whether you’re looking to add rustic charm to your living room, organize your entryway, or simply want to try something new with your weekends, these 18 projects are designed specifically for beginners. Each one uses readily available materials, requires minimal tools, and can be completed in a weekend or less. I’ve carefully selected projects that teach fundamental woodworking skills while creating pieces you’ll actually want to display in your home.
From simple storage solutions to decorative accents, these projects will take you from nervous beginner to confident woodworker. You’ll learn essential techniques like measuring, cutting, drilling, and finishing – all while creating beautiful, functional pieces that cost a fraction of store-bought alternatives. Ready to get your hands dirty and transform some raw lumber into something amazing?
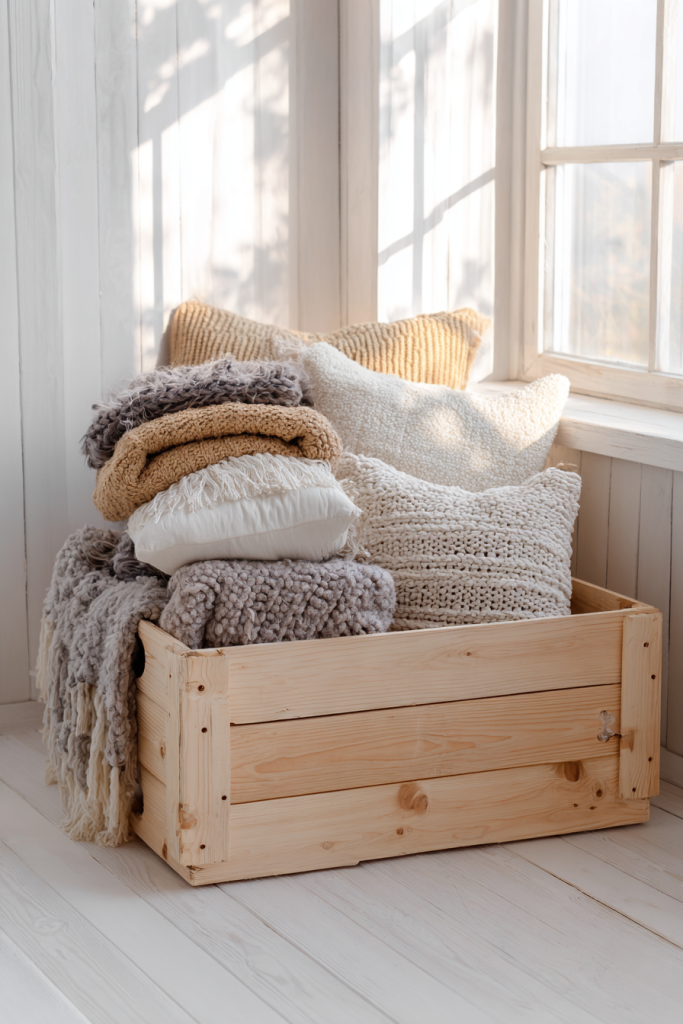
1. Simple Wooden Crate Storage Box
This project is absolutely perfect for your first woodworking adventure – it’s nearly impossible to mess up! Using pre-cut pine boards, you’ll create a versatile storage solution that works anywhere in your home. The beauty lies in its simplicity: four sides, a bottom, and basic wood screws. I love how these crates can be stained in rich walnut tones for a sophisticated look or painted in bright colors for kids’ rooms. The key is using wood glue in addition to screws for extra durability. Pro tip: Sand all pieces before assembly for a professional finish that feels smooth to the touch.
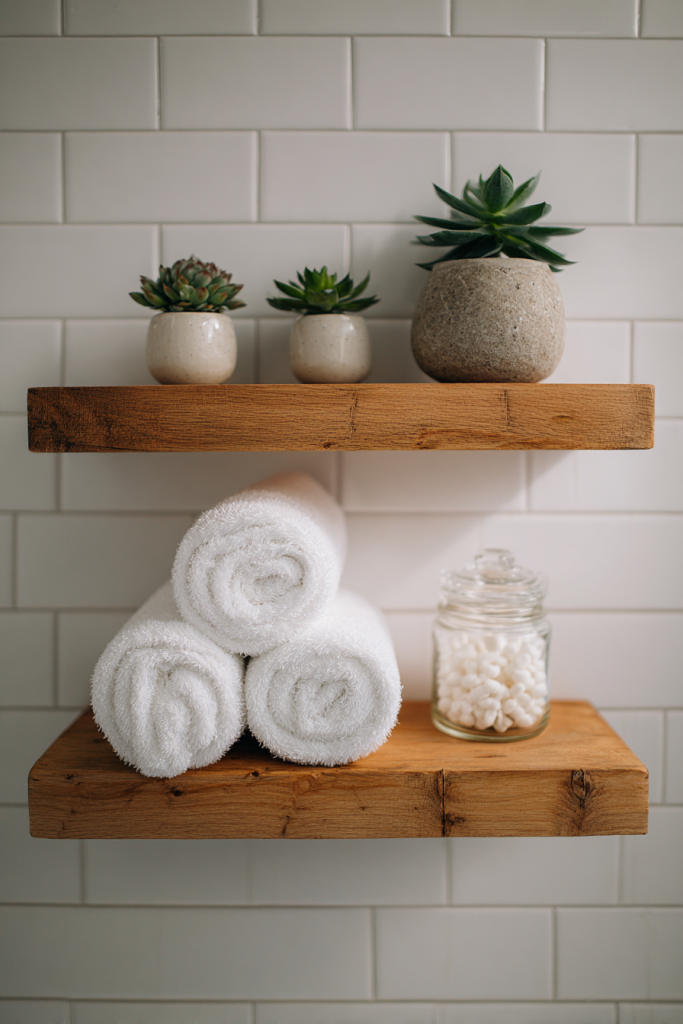
2. Floating Bathroom Shelves
Transform your bathroom into a spa-like retreat with these sleek floating shelves. Using common 1×4 lumber and simple L-brackets, you’ll create the illusion of shelves that magically hover on your wall. The secret is hiding the brackets inside routed channels – but don’t worry, a simple drill and chisel work perfectly for beginners. I recommend using moisture-resistant wood stain or paint specifically designed for bathrooms. These shelves are ideal for displaying plants, candles, or storing everyday essentials while maintaining that clean, minimalist aesthetic that makes small bathrooms feel larger.
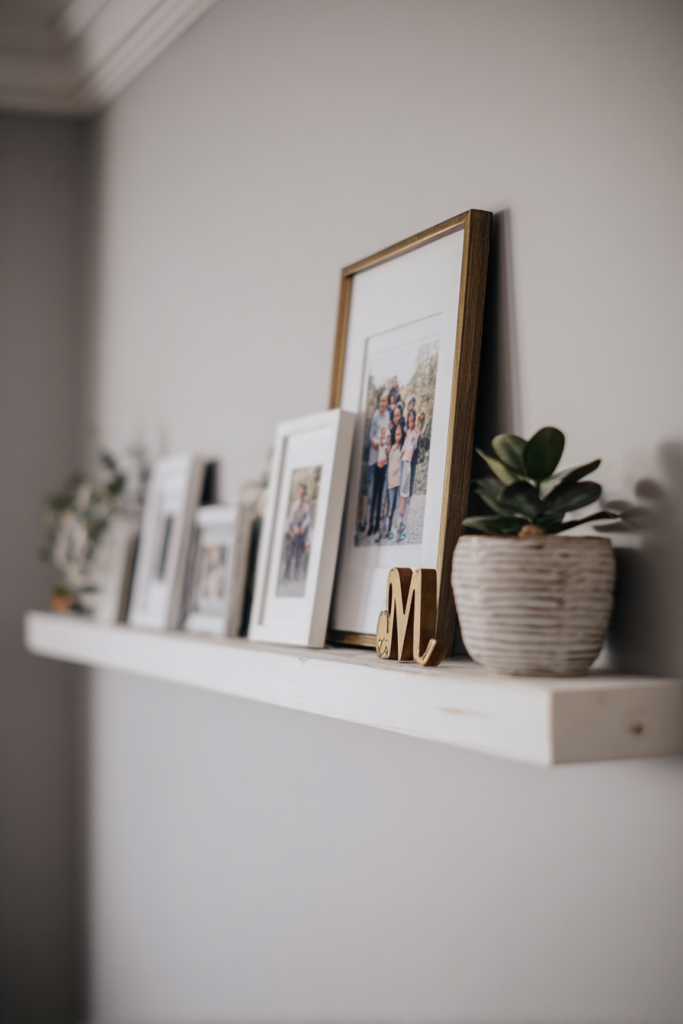
3. DIY Picture Frame Display Ledge
Gallery walls are trendy, but picture ledges offer so much more flexibility for showcasing your favorite photos and artwork. This project uses a simple 1×3 board with a small lip created by adding a thin strip of wood along the front edge. The genius is in the simplicity – no complicated joints or precise measurements needed. You can easily swap out photos, add small plants, or display seasonal decorations. I love painting these in crisp white for a modern look or staining them to match existing trim. The narrow profile means they work perfectly in hallways, above beds, or anywhere you want to add visual interest without overwhelming the space.
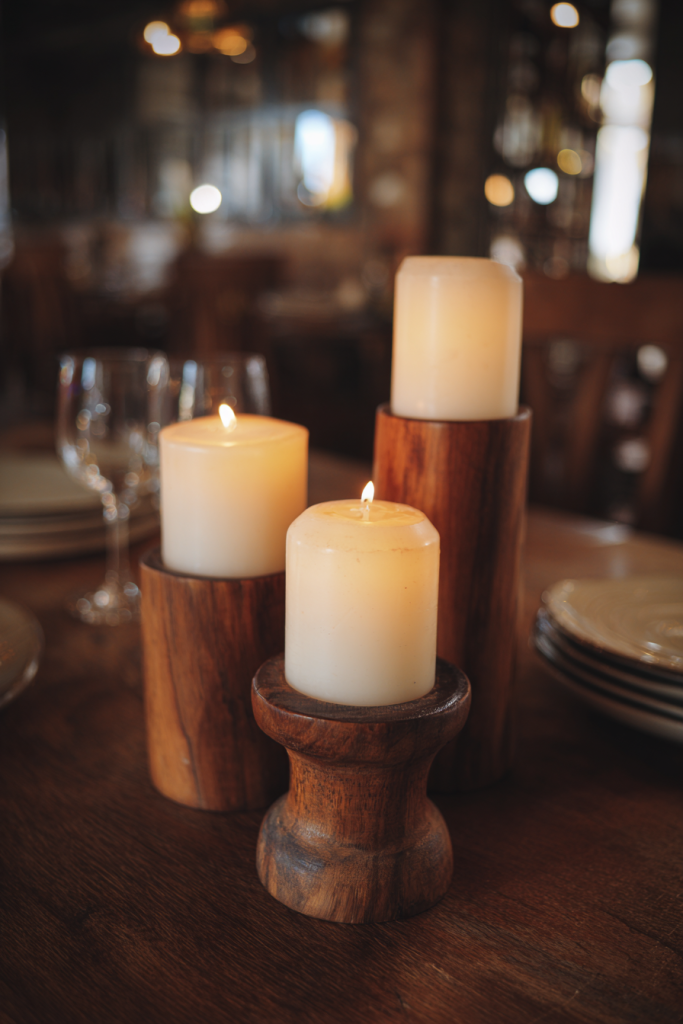
4. Rustic Wooden Candle Holders
Nothing says cozy home ambiance like the warm glow of candles, and these rustic holders add the perfect touch of handmade charm. Using 2×2 or 4×4 lumber, you’ll drill holes to accommodate standard pillar candles or tea lights. The beauty comes from embracing imperfections – slight variations in hole depth and rustic sanding create character. I love experimenting with different wood types: cedar for a natural aromatherapy element, or reclaimed barn wood for authentic farmhouse vibes. Finish with a clear protective coat to prevent wax damage, and consider grouping different heights for visual impact.
5. Easy Plant Stand
Elevate your green friends (literally!) with this simple yet elegant plant stand. Constructed from basic 2×2 lumber in a classic X-frame design, this project teaches you fundamental angle cutting while creating something genuinely useful. The key is keeping the proportions balanced – I recommend a 14-inch square top for most standard planters. You can customize the height based on your space, typically 12-18 inches works well for most rooms. Stain it in natural tones to complement your plants, or paint it bold colors to make a statement. The open design ensures proper air circulation around your plants while adding vertical interest to any room.

6. Wooden Serving Tray
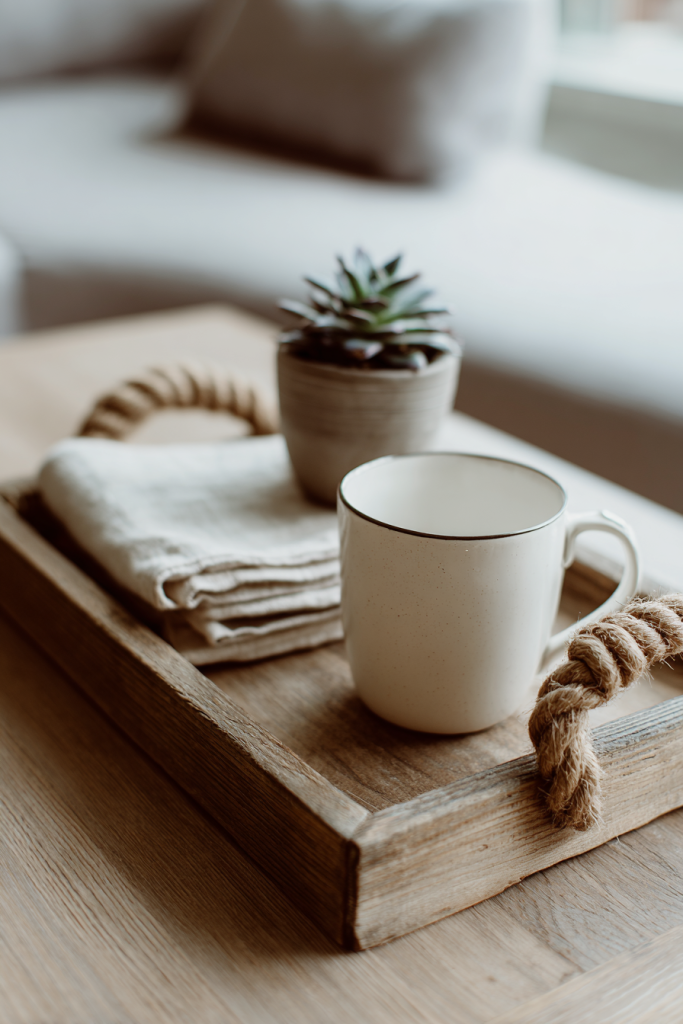
This might be the most rewarding project on the list because you’ll use it constantly! Using a single piece of 1×12 lumber, you’ll create a beautiful serving tray with rope handles that’s perfect for breakfast in bed, outdoor entertaining, or organizing coffee table essentials. The trick is choosing lumber with beautiful grain patterns – each piece will be unique. Drill holes for the rope handles, sand smooth, and finish with food-safe mineral oil for a gorgeous natural look. I love how the rope handles add texture and make the piece feel more expensive than its simple construction suggests.
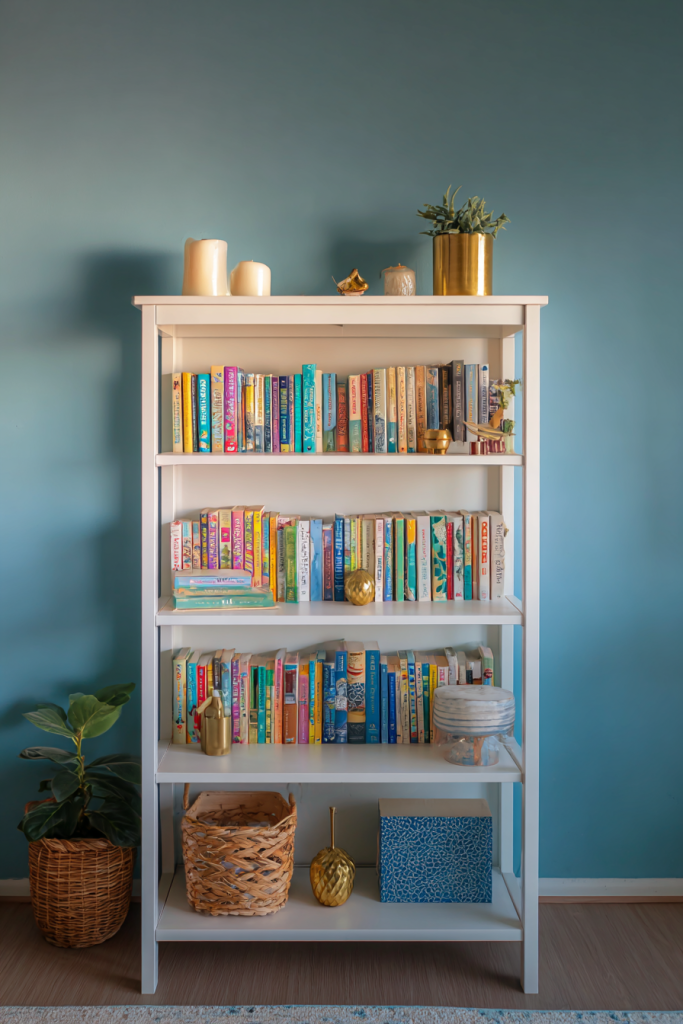
7. Simple Bookshelf
Every home needs more book storage, and this basic bookshelf design is perfect for beginners who want to tackle something slightly more ambitious. Using standard 1×8 pine boards, you’ll create a three-shelf unit that’s both functional and attractive. The construction is straightforward: two sides, three shelves, and a back panel for stability. I recommend pre-drilling all screw holes to prevent splitting, and using wood glue at every joint for professional strength. Paint it crisp white for a clean modern look, or stain it to match existing furniture. The best part? You can easily modify the dimensions to fit your exact space.
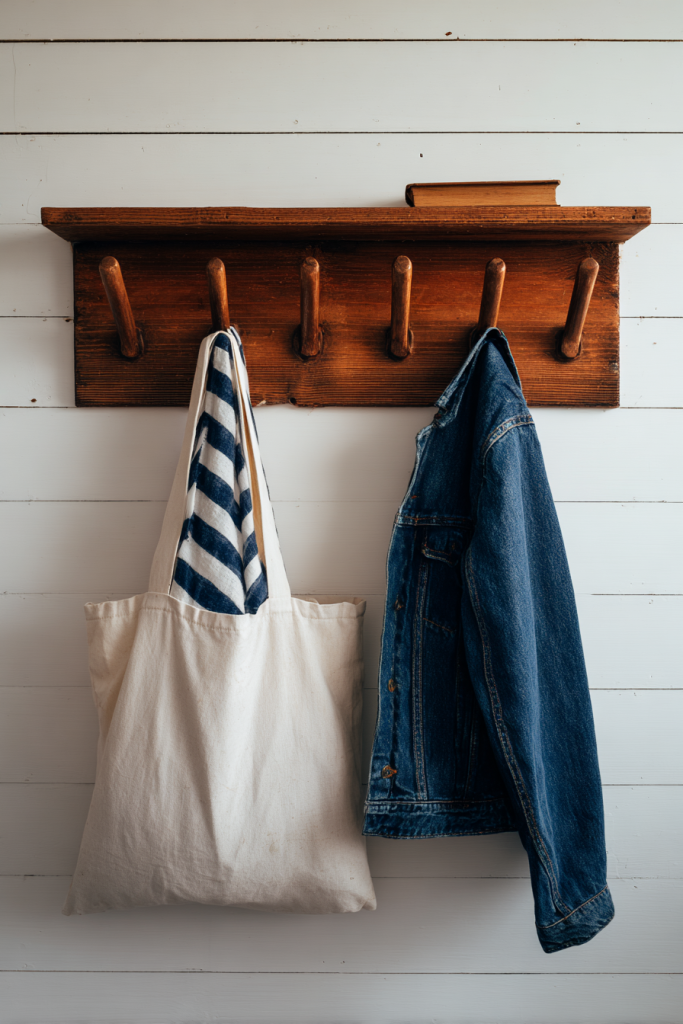
8. Wooden Coat Rack
Transform your entryway from chaotic to organized with this simple wall-mounted coat rack. Using a 1×6 board and wooden dowels or shaker pegs, you’ll create a functional piece that welcomes guests while keeping outerwear tidy. The key is spacing the pegs evenly – I recommend 6-8 inches apart for optimal functionality. Sand everything smooth, then paint or stain to complement your entryway’s style. Consider adding a small shelf on top for keys, sunglasses, or seasonal decorations. This project teaches you precise drilling techniques while creating something your family will use every single day.
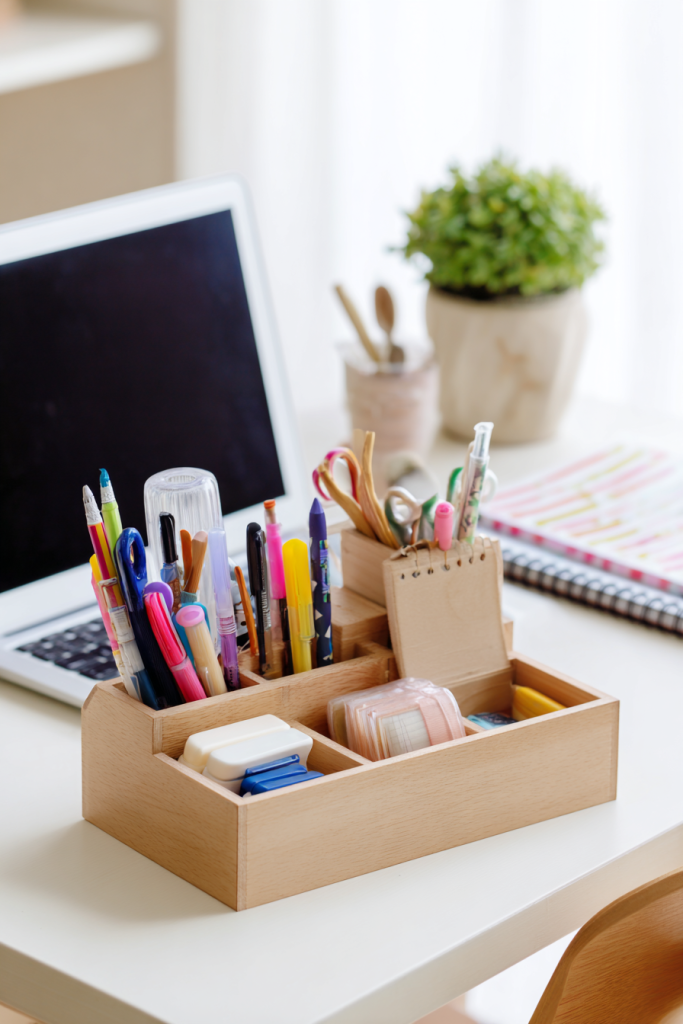
9. Desktop Organizer Box
Keep your workspace tidy with this customizable desktop organizer that’s perfect for pens, pencils, and small office supplies. Using thin plywood or 1×4 lumber, you’ll create compartments sized exactly for your needs. The beauty is in the customization – make sections for different supplies, add dividers for business cards, or create a slot for your phone. I love adding a small drawer made from a matchbox for paper clips and tiny items. Finish with a natural oil to showcase the wood grain, or paint it to match your office decor. This project teaches precision cutting and basic joinery skills.
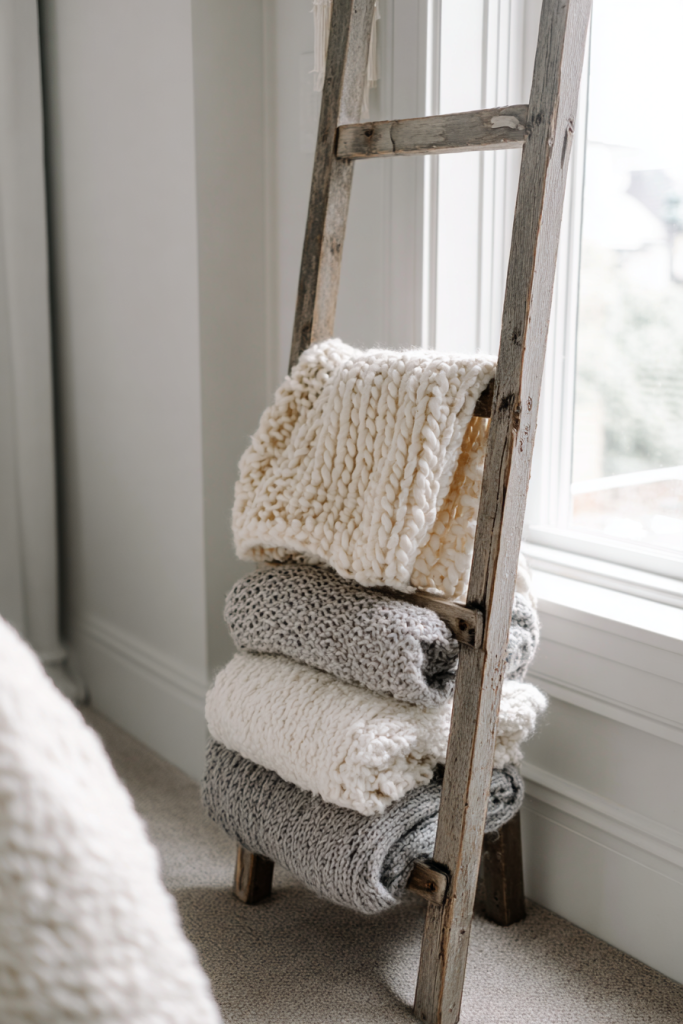
10. Blanket Ladder
Add farmhouse charm to any room with this trendy blanket ladder that’s both decorative and functional. Using two 2×3 boards for the sides and five 1×3 boards for the rungs, you’ll create a piece that leans elegantly against any wall. The key is cutting the side boards at a slight angle at the top for a professional look. Space the rungs about 10 inches apart for optimal blanket display. I love how this piece instantly makes any room feel more cozy and organized. Stain it in weathered gray for modern farmhouse vibes, or keep it natural for Scandinavian minimalism. The angled cuts teach you important measuring and cutting skills while creating a statement piece.
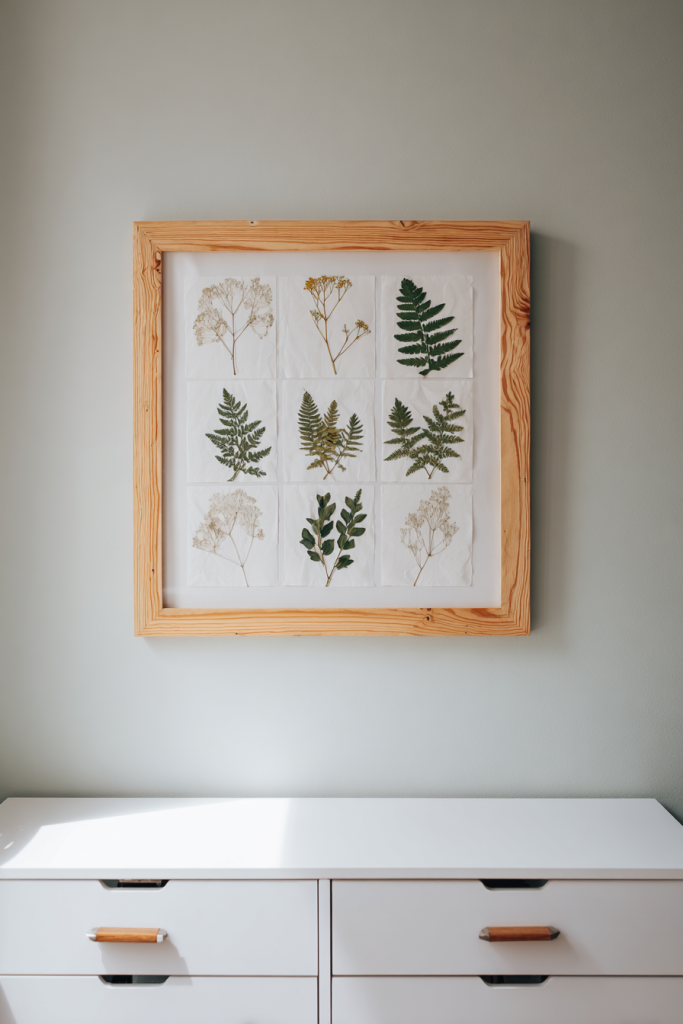
11. Wooden Wall Art Frame
Create stunning wall art without breaking the bank using simple lumber and creativity. This project involves building a large square or rectangular frame using 1×2 lumber, then filling it with anything from fabric to botanical specimens. The frame construction teaches you perfect corner joints using pocket screws or simple butt joints with wood glue. I love experimenting with different fills – pressed flowers for a botanical look, colorful fabric for a pop of color, or even string art for geometric designs. The frame can be stained dark for drama or painted to match your decor. This project proves that beautiful art doesn’t always require expensive materials.
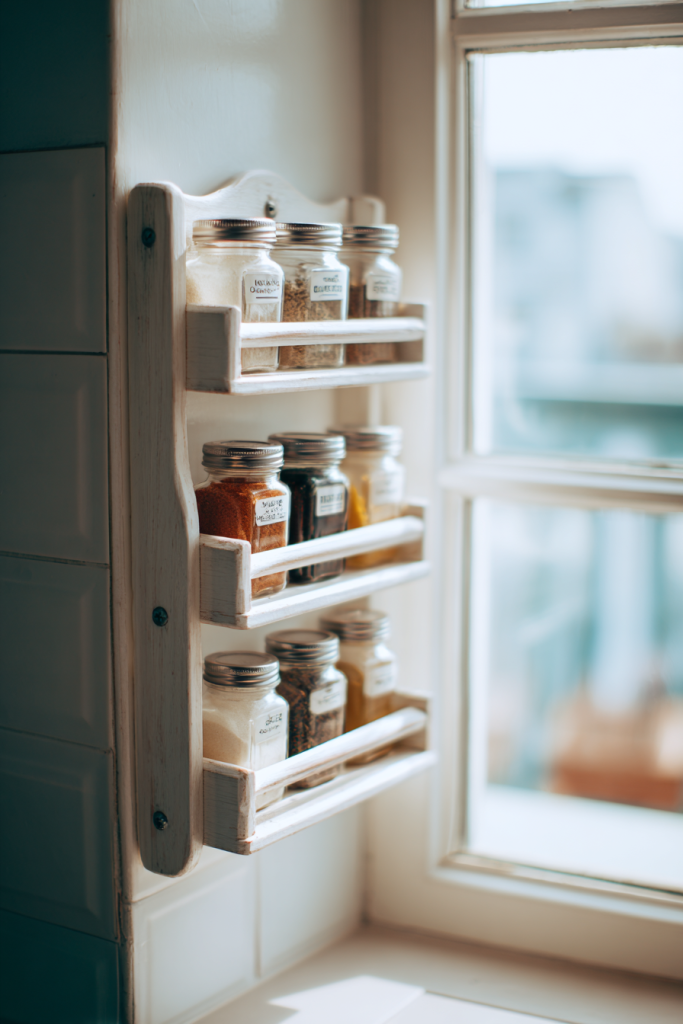
12. Simple Spice Rack
Transform your kitchen organization with this wall-mounted spice rack that keeps seasonings visible and accessible. Using 1×3 lumber for the shelves and 1×2 for the lips that prevent jars from falling, you’ll create a functional piece that looks intentionally designed. The shallow shelves are perfect for standard spice jars, and the open design makes finding what you need effortless. I recommend mounting it inside a pantry door or on a kitchen wall near your cooking area. Paint it white for a clean look, or stain it to match your cabinets. This project teaches you about working in tight spaces and precise measurements.
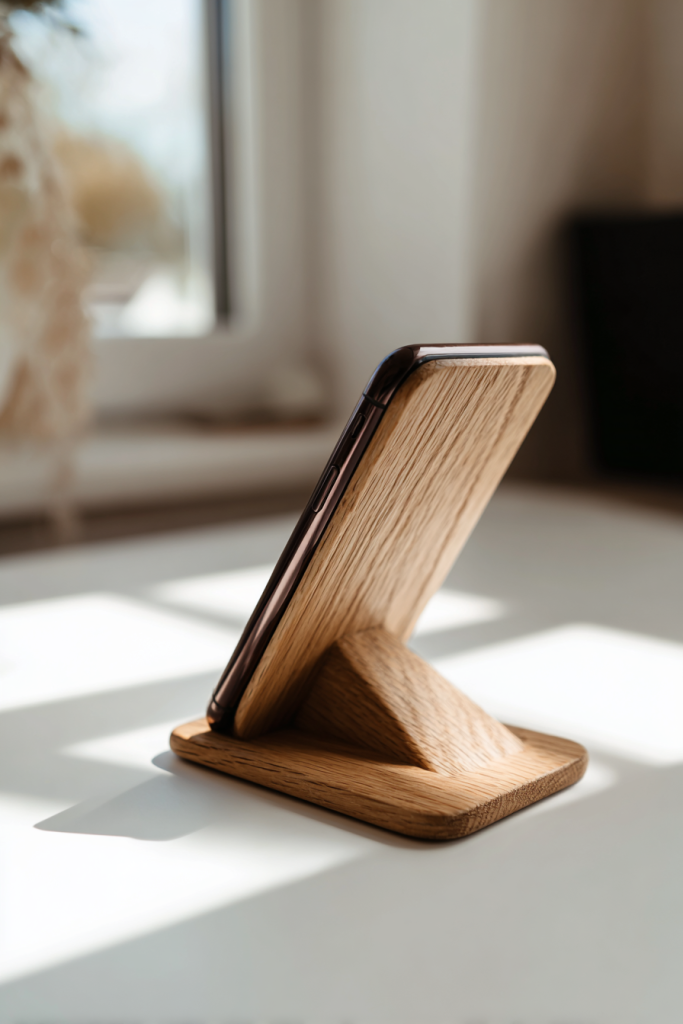
13. Wooden Phone Stand
Keep your phone at the perfect viewing angle with this adjustable wooden stand that’s both practical and attractive. Using a single piece of hardwood like oak or maple, you’ll cut a simple slot and create a stable base that accommodates phones of various sizes. The beauty is in the grain pattern and smooth finish – sand it to 220 grit for a silky feel. I love adding a small groove for charging cables to keep everything tidy. This project is perfect for practicing precision cutting and teaches you about wood selection. Finish with tung oil to bring out the natural beauty while protecting against daily use.
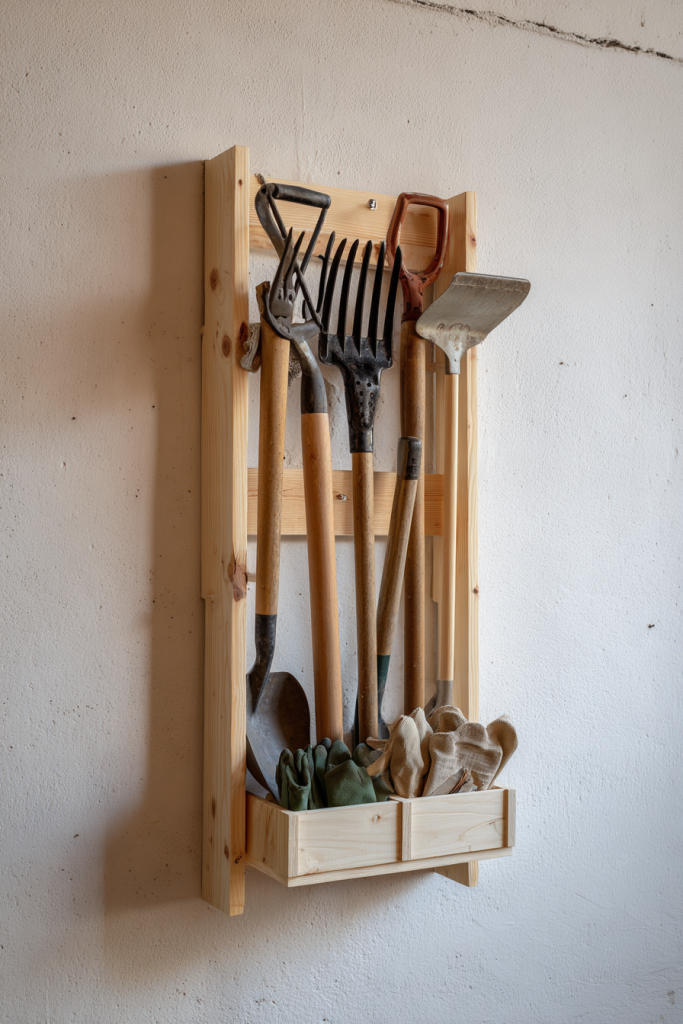
14. Garden Tool Organizer
Bring order to your garage or shed with this simple tool organizer that keeps everything visible and within reach. Using a piece of plywood as the backing and various sized dowels or hooks, you’ll create a custom storage solution for rakes, shovels, and hand tools. The key is measuring your tools first and planning the layout before drilling holes. I recommend adding small shelves for gloves, seed packets, and other garden accessories. Paint the backing board in a bright color to make tools easy to spot, or use natural wood stain for a more traditional look. This project teaches you about planning and problem-solving.
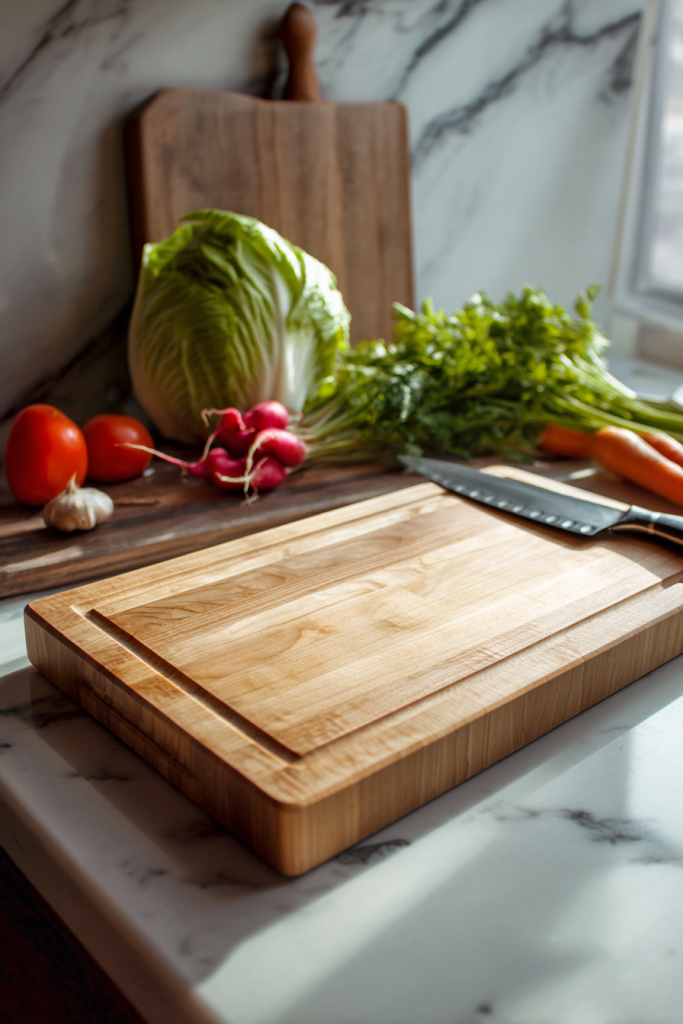
15. Wooden Cutting Board
Every kitchen needs a beautiful cutting board, and making your own ensures you get exactly the size and wood type you prefer. Using hardwood like maple, cherry, or walnut, you’ll learn about wood selection, grain direction, and food-safe finishes. Start with a simple rectangular design, focusing on smooth edges and a flat surface. The key is understanding that end-grain boards are gentler on knives but require more advanced techniques, so stick with edge-grain for your first attempt. Sand progressively to 220 grit and finish with mineral oil and beeswax. This project teaches you about wood properties and creates something you’ll treasure for years.
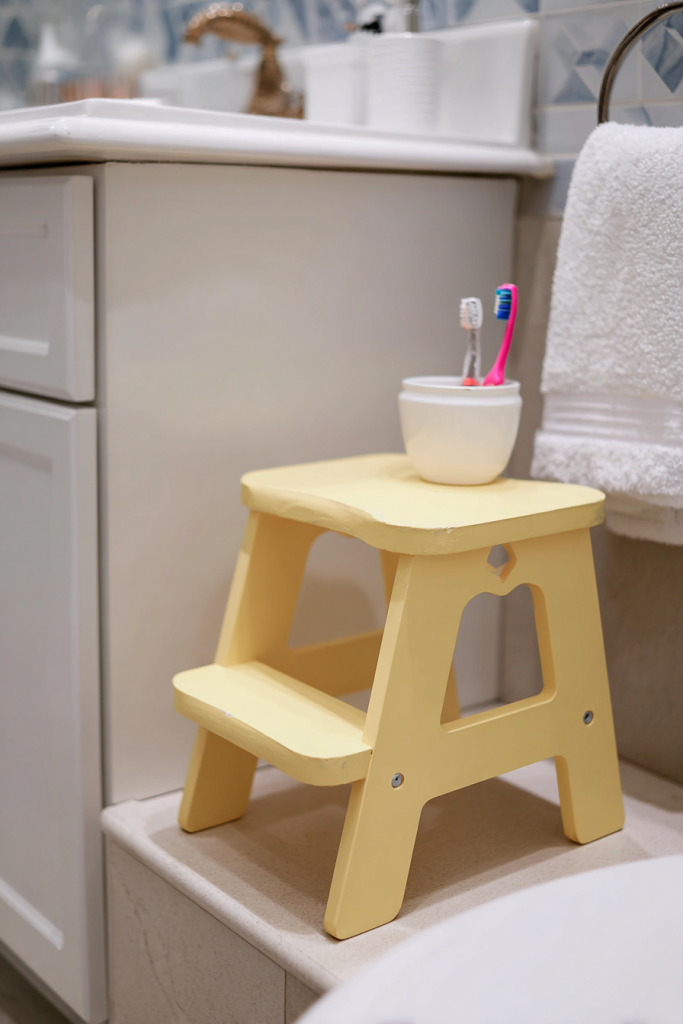
16. Kids’ Step Stool
Help little ones reach new heights safely with this sturdy step stool that’s sized perfectly for small feet. Using 2×8 lumber for the top and simple 2×4 construction for the base, you’ll create a piece that can handle active children while looking attractive in any room. The key is rounding all edges for safety and ensuring the base is wide enough to prevent tipping. I love adding hand grips cut into the sides for easy carrying. Paint it in fun colors to match a child’s room, or keep it natural for timeless appeal. This project teaches you about safety considerations and child-friendly design principles.
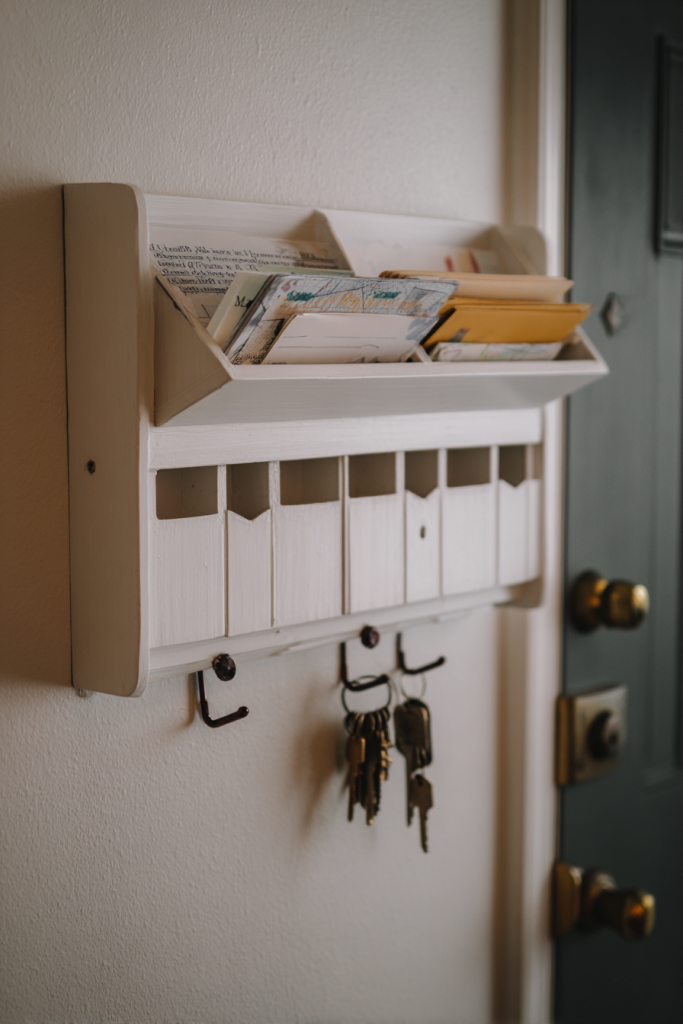
17. Mail Organizer Station
Tame paper clutter with this wall-mounted mail station that sorts bills, letters, and important documents. Using thin plywood or 1×6 lumber, you’ll create multiple slots sized for different types of mail. Add a small shelf on top for keys and a pen holder for immediate access to writing tools. The vertical design saves counter space while keeping everything visible and organized. I recommend labeling each slot clearly and mounting it near your home’s main entrance. Paint it to match your entryway decor, or stain it for a more traditional look. This project combines functionality with organization skills.
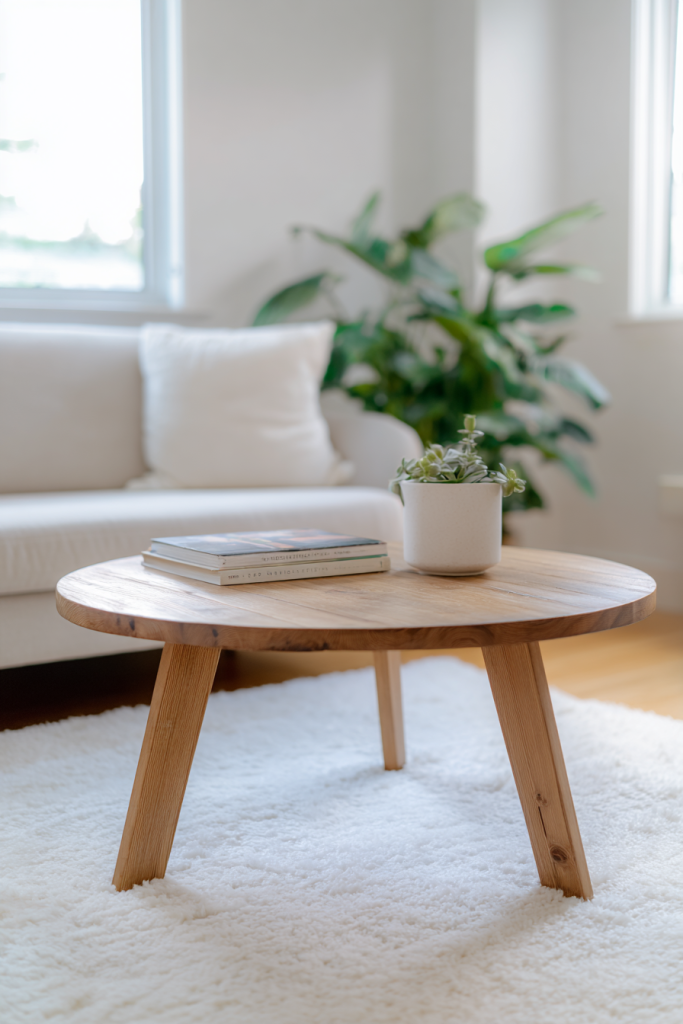
18. Simple Coffee Table
End your beginner woodworking journey with this satisfying coffee table project that brings together everything you’ve learned. Using 2×4 lumber for the frame and a piece of plywood or pine boards for the top, you’ll create a sturdy table perfect for any living room. The simple design focuses on strong joints and smooth finishes rather than complex details. I recommend a lower height (16-18 inches) for modern living rooms or standard height (18-20 inches) for traditional spaces. Add a bottom shelf for extra storage and visual weight. This project teaches you about furniture proportions and structural design while creating a centerpiece for your home.
Conclusion
Congratulations! You’ve just discovered 18 amazing beginner woodworking projects that will transform both your home and your confidence as a maker. Each of these projects is designed to build upon the last, teaching you fundamental skills while creating beautiful, functional pieces you’ll use and admire for years to come.
Remember, woodworking is a journey, not a destination. Start with the simpler projects like the storage crate or serving tray, and work your way up to more complex builds like the coffee table. Don’t be afraid to make mistakes – they’re how we learn and improve. Every professional woodworker started exactly where you are now.
The best part about these projects is their versatility. Feel free to modify dimensions, change finishes, or add your own creative touches. Woodworking is about expressing your personal style while developing practical skills that will serve you throughout your life.
So grab your measuring tape, dust off those basic tools, and start creating. Your first project awaits, and I can’t wait for you to experience the satisfaction of building something beautiful with your own two hands!
Frequently Asked Questions
How much should I expect to spend on my first woodworking project?
Most of these beginner projects cost between $15-50 in materials, depending on wood choice and size. Start with pine or poplar for affordability, and you can always upgrade to hardwoods as your skills develop. Don’t forget to factor in basic supplies like screws, wood glue, and sandpaper.
What tools do I absolutely need to get started?
You can complete most of these projects with just a circular saw or miter saw, drill/driver, measuring tape, square, and sandpaper. Many home improvement stores will cut lumber to size for free, which eliminates the need for saws initially. Borrow or rent tools when possible to keep startup costs low.
How do I choose the right wood for my project?
Pine and poplar are excellent beginner choices – they’re affordable, easy to work with, and readily available. Pine is great for rustic/farmhouse projects, while poplar takes paint beautifully. Avoid hardwoods like oak or maple until you’re comfortable with basic techniques, as they’re more expensive and challenging to work with.
What’s the best finish for a beginner to use?
For most projects, start with pre-stain wood conditioner followed by a simple oil-based stain and polyurethane topcoat. This combination is forgiving, looks professional, and protects the wood well. For painted pieces, use a good primer followed by semi-gloss latex paint for durability and easy cleaning.